Extending lvm disk by adding space

On Vmware Esx server,You can increase size of your virtual hard disk easily.If you use lvm for your guest os,you will need to add new virtual hard disk or just increase the size of your current disk.This guide will help you to extend size of the disk after you resize of your virtual disk by using vsphere

After increased the size on ESX ,In Linux Terminal;

rescanning the device.host id can change and it depents to your system.you must do that if you dont want to restart your guest;

echo “- – -” > /sys/class/scsi_host/host0/scan

see your disk and partitions;
fdisk -l

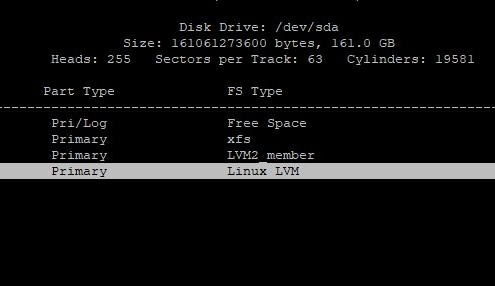
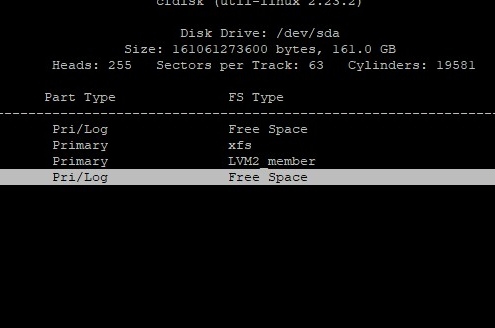
lets add new partitions.after you create the partition,you will need to set type of disk to 8e (LVM)
cfdisk /dev/sda (please note your new partition name sample :sda3

see your disk&partitions status again;
fdisk -l

check for available space;
df -h

scan for new partition
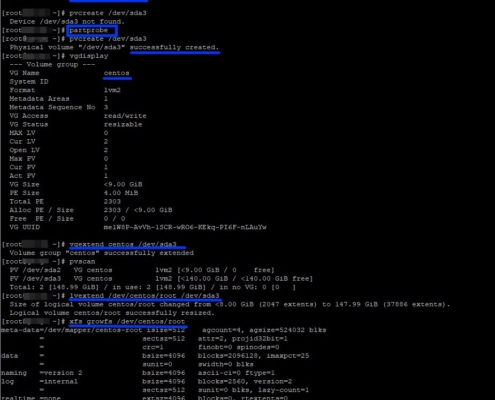
partprobe

create physical volume by using new partitions.(disk name may differ.)
pvcreate /dev/sda3

see your volume group and check and confirm
vgdisplay

extend your volume group
vgextend centos /dev/sda3

recheck;
pvscan

extend your logical volume with using the new part
lvextend /dev/centos/root /dev/sda3

in this point,last step may change according to your file system.if you use xfs ;
xfs_growfs /dev/centos/root

for ext4

resize2fs /dev/centos/root

finally see your new available space

df -h

Failed to load SELinux policy. Freezing. Centos 7

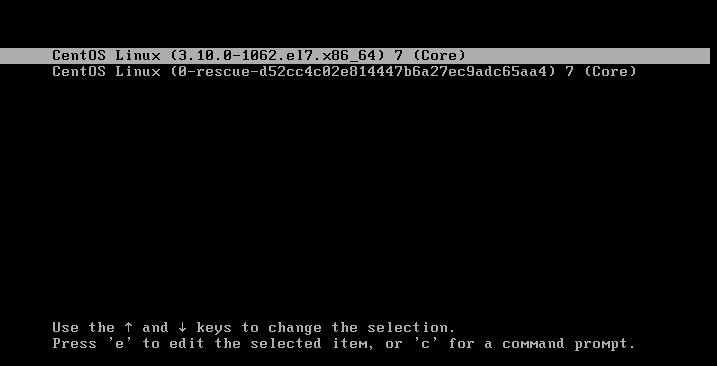
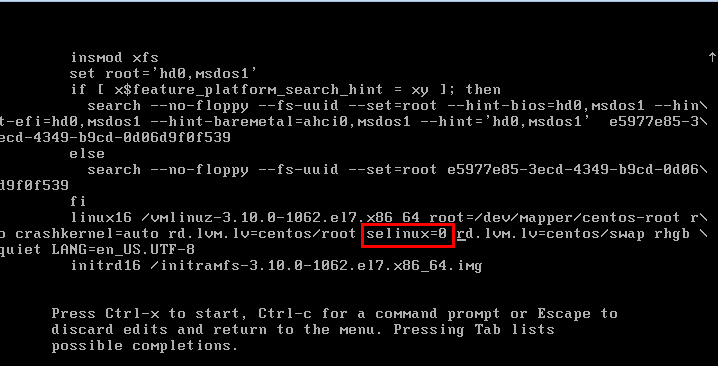
If the Linux server fails on boot with a message like this,You should add a parameter in grub boot editor which appears on boot.

When your server opens kernel list will appear on your screen.You use the arrow keys a kernel line like “Centos Linux 7 (Core) with Linux….” and type “e” button to edit.

After that,find the line which starts with linux add “selinux=0” like this below and type Ctrl button+x.Your server will open normally.After your server boots,fix the main problem about selinux that you have previously changed

Cloudlinux saving common php settings permanently for all installed versions

When you update cloudlinux,it also will be updated the php.ini files.Therefore you will lost your customized php settings like disable_functions.You can write some of yours into common settings file instead of editing php.ini’s directly.

Login to your cloudlinux and change directory to /etc/cl.selector/

You will see the file named global_php.ini.It is effective for your all installed alt-php* versions.Please open it by your favorite editor like nano or vi.

Sample global_php.ini with applied disable_functions directive

; This file provides global settings for php.ini of all alt-php packages
; The structure of this file:
; option = value
; To confirm changes (not affecting “date.timezone” and “error_log” options) please run:
; /usr/sbin/cagefsctl –setup-cl-selector
; To confirm changes (including “date.timezone” and “error_log” options) please run:
; /usr/bin/selectorctl –apply-global-php-ini
; or
; /usr/sbin/cagefsctl –apply-global-php-ini
; If you don’t want to change error_log, but want to change date.timezone, you can execute
; selectorctl –apply-global-php-ini date.timezone
; Similarly, command
; selectorctl –apply-global-php-ini error_log
; applies error_log and all other options specified in /etc/cl.selector/global_php.ini file, except date.timezone.
; So, you can specify 0, 1 or 2 parameters from the list: error_log, date.timezone
; using –apply-global-php-ini without arguments applies all global php options including two above
; Example:
; selectorctl –apply-global-php-ini error_log
; selectorctl –apply-global-php-ini date.timezone
; selectorctl –apply-global-php-ini date.timezone error_log
; The latter command has the same effect as /usr/bin/selectorctl –apply-global-php-ini
[Global PHP Settings] disable_functions= proc_open,escapeshellcmd,escapeshellarg, show_source,
posix_mkfifo, ini_restore, mysql_list_dbs, get_current_user, getmyuid,pconnect, link, symlink, fin, exec, fileread, shell_exec, pcntl_exec, leak, apache_child_terminate, ch
own, posix_kill, posix_setpgid, posix_setsid, posix_setuid, proc_terminate, syslog, fpassthru, execute, shell, chgrp, stream_select, passthru, socket_select, socket_create,
socket_create_listen, socket_create_pair, socket_listen, socket_accept, socket_bind, socket_strerror, pcntl_fork, pcntl_signal, pcntl_waitpid, pcntl_wexitstatus, pcntl_wif
exited, pcntl_wifsignaled, pcntl_wifstopped, pcntl_wstopsig, pcntl_wtermsig, openlog, apache_get_modules, apache_get_version, apache_getenv, apache_note, apache_setenv, vir
tual, eval, allow_url_fopen, pconnect, p_connect,posix_getpwuid,fileowner,sym

You should write your own directives down the global php settins tag in same syntax of standart php.ini [Global PHP Settings]

After then save and close the editor and apply it by this command

[root@srv ~]# selectorctl –apply-global-php-ini

Plesk Cloudlinux LveManager Extension Error

You can manage hosting limits or reseller limits by using lve manager extension (module) inside the plesk hosting control panel.It is useful because you can set some limits to your hosting accounts by using plesk ui.But if you login to plesk with using HTTP,some errors will be occur.Therefore, you must login to plesk with https protocol to work with this extension properly

Related Error Message

Platform error.It seems your session expired.Please login into the platform.You will be redirected to login page.

Error.Bad forgery protection token

Prevent your server from bad bot attacks

We need some iptables rules and a file that includes ip addresses.These addresses are belong to bad bots

I use a shell script that reads ip addresses one by one from afile and block it by using iptables.

Firstly,You have to create a file.for example under root folder and it’s name is bad_bot.txt

nano /root/bad_bot.txt.Write it ip addresses that you want to block into this file.You can use my own list bad_bot.txt file

If you want it run at every system boot,please write it in rc.local file.

iptables -F

for x in $(cat /root/bad_bot.txt)
do
iptables -A INPUT -p tcp -s $x –dport 80 -j DROP
iptables -A INPUT -p tcp -s $x –dport 443 -j DROP
done


Fix Apache SSL vulnerabilites

For Centos Servers;

Please add these lines to the end of /etc/httpd/conf.d/ssl.conf file and restart httpd service

<IfModule mod_ssl.c>
SSLProtocol +TLSv1 +TLSv1.1 +TLSv1.2 -SSLv2 -SSLv3
</IfModule>
<IfModule mod_ssl.c>
#SSLCipherSuite HIGH:!aNULL:!MD5:!RC4-SHA:!RC4
#SSLCipherSuite ECDH+AESGCM:DH+AESGCM:ECDH+AES256:DH+AES256:ECDH+AES128:DH+AES:ECDH+3DES:DH+3DES:RSA+AESGCM:RS
SSLCipherSuite HIGH:MEDIUM:!aNULL:!MD5::!RC4
</IfModule>

How to Install Maxmind module for Apache

We explain how to install maxmind apache module for geoip url filtering on Centos/Cloudlinux and Ubuntu/Debian Servers.

First install this module for Centos/Cloudlinux distro.You should install the maxmind library on your server first.After than you should install the apache extension tool (apxs) on your server too.If you don’t know how to install any software on your centos server,you can choose the easy way.I prepared a shell script which includes all requirement steps.These are below.This is the content of  “https://www.linux-destek.com/maxmind/maxmind.sh” file.Notice that it already has a compiled maxmind library which one is “.so” file.It work with newer version of Centos and Clodlinux.So you don’t have to compile it yourself.Choose is yours.

#!/bin/bash
yum -y install libmaxminddb.x86_64 libmaxminddb-devel.x86_64
wget https://www.linux-destek.com/maxmind/modmaxmind.tar.gz
tar zxvf modmaxmind.tar.gz
cd modmaxmind/
cp mod_maxminddb.so /usr/lib64/httpd/modules/
mkdir /usr/local/share/GeoIP/
cp GeoLite2-Country.mmdb /usr/local/share/GeoIP/
cp apache.conf /etc/httpd/conf.d/maxmind.conf
service httpd restart

For Centos / Cloudlinux Users download it by using wget into your server and run it.After it is downloaded.You should review the file’s content.It must be includes same lines above.

wget https://www.linux-destek.com/maxmind/maxmind.sh

Then run it as root.

/bin/bash maxmind.sh

That’s it.