odbc and php mssql support for cloudlinux

For your Cloudlinux or a different Redhat based server, add the appropriate version repo below to your server.

#RHEL 7 and Oracle Linux 7

#curl https://packages.microsoft.com/config/rhel/7/prod.repo | sudo tee /etc/yum.repos.d/mssql-release.repo

#RHEL 8 and Oracle Linux 8

# curl https://packages.microsoft.com/config/rhel/8/prod.repo | sudo tee /etc/yum.repos.d/mssql-release.repo

#RHEL9

# curl https://packages.microsoft.com/config/rhel/9/prod.repo | sudo tee /etc/yum.repos.d/mssql-release.repo

Delete any potentially conflicting packages from the system.

# yum remove unixODBC-utf16 unixODBC-utf16-devel

Install odbc package from Microsoft repo

ACCEPT_EULA=Y yum install -y msodbcsql17 unixODBC-devel

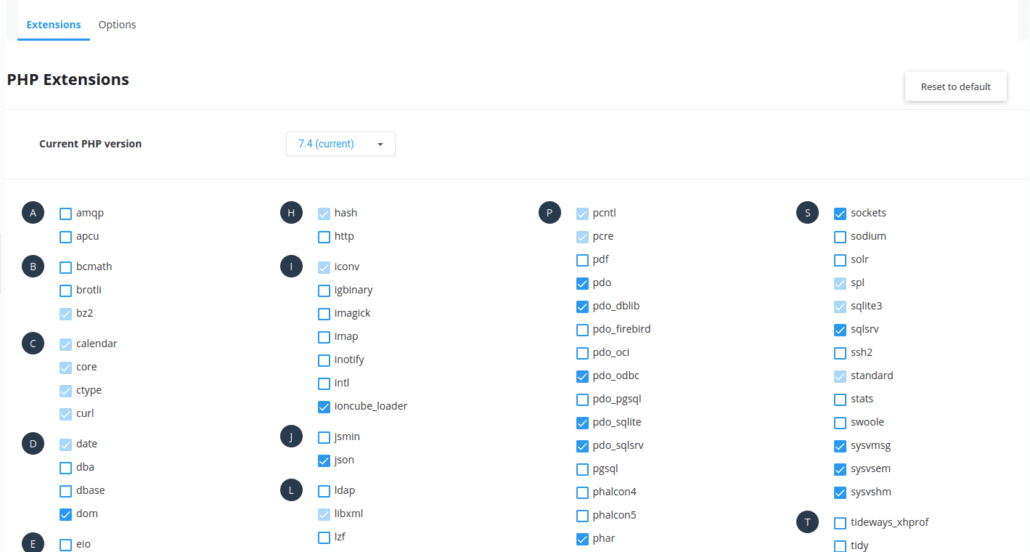
Go to the PHP selector settings of the hosting where you will connect to Microsoft SQL Server with your PHP codes and activate the pdo, pdo_odbc, pdo_sqlsrv, sqlsrv plugins and optionally the pdo_dblib plugin.
 

You need to include the package you installed for Cloudlinux OS in the cagefs structure. This will not be necessary on other RH-based systems…

# cagefsctl –addrpm unixODBC

# cagefsctl –force-update

Then test your connection with a test script.

Sample Code


<?php

    $server = "";
    $database = "";
    $kullaniciadi = "";
    $sifre = "";
    $Karakter = "utf-8";
    $Port = "1433";


    try
    {
      
        $db = new PDO("sqlsrv:Server=$server;Database=$database;", "$kullaniciadi", "$sifre");
        //$db = odbc_connect("Driver={SQL Server};Server=$server,$Port;Database=$database;",  $kullaniciadi, $sifre);
 
        
        if ($db)
    	    echo "success"; 

   }
    catch (Exception $e)
    {
        //Eğer bağlantı sırasında bir hata oluşursa ekrana oluşan hata bastırılacaktır.
        echo $e->getMessage();
    }
     exit;

?>


Remove specific mails from postfix queue with jq

In this example, all emails whose sender is a@bc.com are deleted from the queue.

postqueue -j | jq -r ‘select(.sender == “a@bc.com”) | .queue_id’ | xargs -I {} postsuper -d {}

jq must be installed ( apt install jq )

for other filtering criteria

postqueue -j | jq

You can type and see the fields in the json output.

Phalcon Php Framework 3.x Installation

Phalcon 3.x (old version) installation steps on Cyber Panel + Ubuntu 20 server

1.Install the pecl and pear plugins for the php version you want.

apt install lsphp72-pecl lsphp72-pear


2. Download Phalcon 3.4.5 tar file.

wget https://github.com/phalcon/cphalcon/archive/refs/tags/v3.4.5.tar.gz

tar zxvf v3.4.5.tar.gz

cd cphalcon-3.4.5/build/

./install


3.If all steps are successful, add the ini file

Create phalcon.ini file under /usr/local/lsws/lsphp72/etc/php/7.2/mods-available. Restart openlitespeed.

cat phalcon.ini

#extension=psr.so #Required for v4 and later.
extension=phalcon.so


Note: Similarly, you can install Phalcon v4, but it requires psr plugin. For this;

cd /usr/local/lsws/lsphp72/bin

./pecl install psr-1.1.0


Centos /Cloudlinux 7 error restarting a systemd service

Unable to register authentication agent

** (pkttyagent:478736): WARNING **: 18:16:34.777: Unable to register authentication agent: GDBus.Error:org.freedesktop.PolicyKit1.Error.Failed: Cannot determine user of subject Error registering authentication agent: GDBus.Error:org.freedesktop.PolicyKit1.Error.Failed: Cannot determine user of subject (polkit-error-quark, 0)

# groupadd -g 23 nohidproc
# usermod -a -G nohidproc polkitd
# mount -o remount,rw,hidepid=2,gid=nohidproc /proc
# systemctl restart polkit


nano /etc/fstab
# comment the following line :
from : proc /proc proc defaults,hidepid=2 0 0
to : # proc /proc proc defaults,hidepid=2 0 0
# add the following line
proc /proc proc defaults,hidepid=2,gid=nohidproc 0 0

Add MX Record with Custom Priority for Plesk

/sbin/plesk bin dns -a abc.com -mx "" -mailexchanger mail.abc.com -priority 1

Fix the glibc error at boot

Environment: Centos 7 Boot Process

Error : System Hanging at “Starting Switch Root”,Boot fails.

Solution: Replace/Reinstall glibc-x.x.x.el7.x86.64 package after boot your server with centos rescue dvd / cd / iso image

rpm -ivh –root=/mnt/sysimage –replacefiles –replacepkgs /run/install/repo/Packages/glibc-x.x.x.el7.x86.64.rpm

Imunify360 enable malware cleanup for all users

One line script for enable malware cleanup for all users.It can be used as batch script for every feature those can be applied only user basis.

Other command line options described here

for i in $(awk -F: ' $3 >= 10000 {print $1}' /etc/passwd); do imunify360-agent feature-management enable --feature av --users $i; done

Delete command history with last command

this command will remove commands history  with itself in an given offset as well

for h in $(seq 1968 1975); do history -d 1968; done; history -d $(history 1 | awk '{print $1}')

Connect to android device screen from ubuntu pc

Scrcpy is a software to connect to your android device (phone or tablet) from your ubuntu pc.

It is really fast and stable.All you have to do is install the software with using apt

$ sudo apt install scrcpy

and then connect your android device to your pc via usb cable.Enable adb usb debugging.and run the tool

$ scrcpy
INFO: scrcpy 1.12.1 <https://github.com/Genymobile/scrcpy>
/usr/share/scrcpy/scrcpy-server: 1 file pushed. 7.9 MB/s (24773 bytes in 0.003s)
INFO: Initial texture: 1080x1920

and Thumbs up! they really made a good software.I appreciate.Thanks to Genymobile!

Github page https://github.com/Genymobile/scrcpy