odbc and php mssql support for cloudlinux

For your Cloudlinux or a different Redhat based server, add the appropriate version repo below to your server.

#RHEL 7 and Oracle Linux 7

#curl https://packages.microsoft.com/config/rhel/7/prod.repo | sudo tee /etc/yum.repos.d/mssql-release.repo

#RHEL 8 and Oracle Linux 8

# curl https://packages.microsoft.com/config/rhel/8/prod.repo | sudo tee /etc/yum.repos.d/mssql-release.repo

#RHEL9

# curl https://packages.microsoft.com/config/rhel/9/prod.repo | sudo tee /etc/yum.repos.d/mssql-release.repo

Delete any potentially conflicting packages from the system.

# yum remove unixODBC-utf16 unixODBC-utf16-devel

Install odbc package from Microsoft repo

ACCEPT_EULA=Y yum install -y msodbcsql17 unixODBC-devel

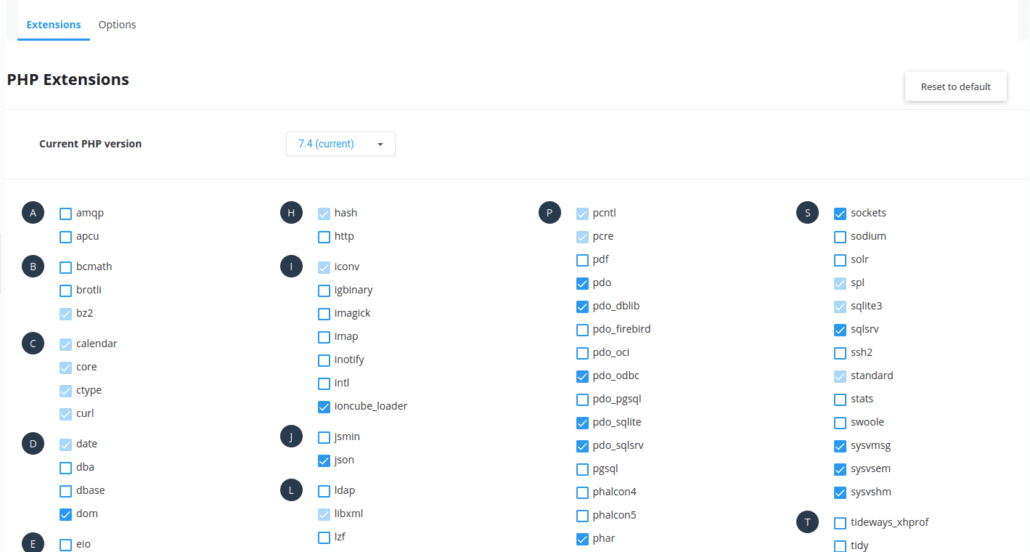
Go to the PHP selector settings of the hosting where you will connect to Microsoft SQL Server with your PHP codes and activate the pdo, pdo_odbc, pdo_sqlsrv, sqlsrv plugins and optionally the pdo_dblib plugin.


You need to include the package you installed for Cloudlinux OS in the cagefs structure. This will not be necessary on other RH-based systems…

# cagefsctl –addrpm unixODBC

# cagefsctl –force-update

Then test your connection with a test script.

Sample Code


<?php

    $server = "";
    $database = "";
    $kullaniciadi = "";
    $sifre = "";
    $Karakter = "utf-8";
    $Port = "1433";


    try
    {
      
        $db = new PDO("sqlsrv:Server=$server;Database=$database;", "$kullaniciadi", "$sifre");
        //$db = odbc_connect("Driver={SQL Server};Server=$server,$Port;Database=$database;",  $kullaniciadi, $sifre);
 
        
        if ($db)
    	    echo "success"; 

   }
    catch (Exception $e)
    {
        //Eğer bağlantı sırasında bir hata oluşursa ekrana oluşan hata bastırılacaktır.
        echo $e->getMessage();
    }
     exit;

?>


List access or error log files with their sizes plesk hosting servers

List all access log files;

find /var/www/vhosts/*/logs/error_log -exec ls -la {} \; | awk '{print $5 " " $9}' | sort -n

List all error log files;

find /var/www/vhosts/*/logs/access_log -exec ls -la {} \; | awk '{print $5 " " $9}' | sort -n

For access logs,there are also other access log files in that directory.For example,access_ssl_log,access_ssl_log.processed and more.So to list all files that starts with access,use wildcards like;

find /var/www/vhosts/*/logs/access* -exec ls -la {} \; | awk '{print $5 " " $9}' | sort -n

Unable to change hosting php version in php selector for Cloudlinux

In this case,problem is file permissions for php.ini file related that you want to switch php version.

Login to shell and change the group owner of related file.Sample command is for php 7.4

chgrp linksafe /opt/alt/php74/etc/php.ini

Change compression type for Plesk backups

As a new feature,Plesk picked up zstd compression method for backups.If you want to create backup files with classic method you can edit the panel.ini file in two way

1. Go to Extensions ->Install and activate panel editor extension and open the editor in my extensions section

Select the editor and add these;

[pmm]
compressionMethod = deflate

2.Login to shell.Open /usr/local/psa/admin/conf/panel.ini file with your favorite editor like nano or vi.Add theses line to the appropriate place

[pmm]
compressionMethod = deflate

Note.You may already see [pmm] section.In this case you just add compressionMethod = deflate

below the [pmm] section.

Most Used Linux Commands For File Compression

Gzip

Compress a file with gzip

$ gzip filename

Compress and keep the original file

$ gzip -c file > file.gz

Compress all files in a folder

$ gzip -r foldername

Tar.gz

$ tar -czvf filename.tar.gz directory

ZSTD Compression

Install first the package,

$ sudo apt install zstd (Debian/Ubuntu)

$ dnf install zstd (Centos,AlmaLinux,Fedora,Redhat)

Usage:

to compress a file :

zstd example.txt

Using with tar:

tar --zstd example.tar.zst example/

ZSTD Uncompression

tar --use-compress-program=unzstd -xvf archive.tar.zst


How to Install Maxmind Geoip module for Litespeed

Previously I wrote a document that how to install Maxmind module for Apache web server.

Also I wrote how to block requests from countries wherever you want.

After four years I think you might need to this for litespeed because lots of hosting companies use that.

First of all,before install,you need same thing :the maxmind country ip database here (You should login first to https://www.maxmind.com


First create a folder named GeoIP under /usr/local/share/

Download the gzip or tarball and extract to /usr/local/share/GeoIP/GeoLite2-Country.mmdb<–sample name.we will use this path in litespeed admin console.

After login to your litespeed admin console->Configuration->Server

In general tab,you will see geoip lookup setting.So you enable it.

And find the details of maxmind settings section

You see this is already configured.Yours will be empty.Ignore that.So you need to add some details like below;

File path must be true.DB name is really important and variable section is mandatory field.it is better to set as is.and save.Restart the litespeed server.

After you do that You verify it is installed correctly.Therefore you must see geoip variable in phpinfo page.So you upload a php file that includes phpinfo and load it from your browser.

If you see that server variable then you can create some rules about deny some requests;

Assume you use Centos or Cloudlinux,go to /etc/httpd/conf.d and create a file named maxmind.conf (name is optional but it should ends with .conf)

maxmind.conf

<IfModule LiteSpeed>
GeoIPEnable On
</IfModule>

<IfModule mod_geoip.c>

<FilesMatch “wp-login.php|xmlrpc.php”>

SetEnvIf GEOIP_COUNTRY_CODE ^(US) AllowCountry
######Deny from env=BlockCountry
Allow from env=AllowCountry
Deny from All

</FilesMatch>

<LocationMatch “^/”>

SetEnvIf GEOIP_COUNTRY_CODE ^(US) AllowCountry
######Deny from env=BlockCountry
Allow from env=AllowCountry
Deny from All

</LocationMatch>

<LocationMatch “^/admin”>

SetEnvIf GEOIP_COUNTRY_CODE ^(US) AllowCountry
######Deny from env=BlockCountry
Allow from env=AllowCountry
Deny from All

</LocationMatch>

<LocationMatch “^/wp-admin”>

SetEnvIf GEOIP_COUNTRY_CODE ^(US) AllowCountry
######Deny from env=BlockCountry
Allow from env=AllowCountry
Deny from All

</LocationMatch>

</IfModule>

1.First section enables the geoip lookup

2.Filesmatch directive matches request to your spesific file name regardless of where.So it can be / or /abc.

3.Locationmatch is a folder generally

So according to these directives Accessing outside of US to your site root /,/admin and /wp-admin will be blocked as well as wp-login.php and xmlrpc.php

You can allow multiple country by adding their iso codes with this syntax (I guess)

SetEnvIf GEOIP_COUNTRY_CODE ^(US|FR|DE) AllowCountry

After you finish your configuration file,save it and restart litespeed.

To verify,Opera browser or open proxies will help you.

Cloudlinux Setting Global Php Directives

When you want to apply one or more php directives like disable_functions,datetime.zone or something else to all your customers websites,you should write these to /etc/cl.selector/global_php.ini file.After you write your directives enter this command to apply

selectorctl –apply-global-php-ini

/usr/sbin/cagefsctl –setup-cl-selector

You can see the example below.

; This file provides global settings for php.ini of all alt-php packages
; The structure of this file:
; option = value
; To confirm changes (not affecting “date.timezone” and “error_log” options) please run:
; /usr/sbin/cagefsctl –setup-cl-selector
; To confirm changes (including “date.timezone” and “error_log” options) please run:
; /usr/bin/selectorctl –apply-global-php-ini
; or
; /usr/sbin/cagefsctl –apply-global-php-ini
; If you don’t want to change error_log, but want to change date.timezone, you can execute
; selectorctl –apply-global-php-ini date.timezone
; Similarly, command
; selectorctl –apply-global-php-ini error_log
; applies error_log and all other options specified in /etc/cl.selector/global_php.ini file, except date.timezone.
; So, you can specify 0, 1 or 2 parameters from the list: error_log, date.timezone
; using –apply-global-php-ini without arguments applies all global php options including two above
; Example:
; selectorctl –apply-global-php-ini error_log
; selectorctl –apply-global-php-ini date.timezone
; selectorctl –apply-global-php-ini date.timezone error_log
; The latter command has the same effect as /usr/bin/selectorctl –apply-global-php-ini
[Global PHP Settings] disable_functions = mail,system, dl, array_compare, array_user_key_compare, passthru, cat, exec, popen, proc_close, proc_get_status, proc_nice, proc_open,escapeshellcmd,escapeshellarg, show_source,posix_mkfifo, ini_restore, mysql_list_dbs, get_current_user, getmyuid,pconnect, link, symlink, fin, fileread, shell_exec, pcntl_exec, leak, apache_child_terminate,chown, posix_kill, posix_setpgid, posix_setsid, posix_setuid, proc_terminate, syslog, fpassthru, execute, shell, chgrp, passthru, socket_select,socket_create, socket_create_listen, socket_create_pair, socket_listen, socket_accept, socket_bind, socket_strerror, pcntl_fork, pcntl_signal, pcntl_waitpid,pcntl_wexitstatus, pcntl_wifexited, pcntl_wifsignaled, pcntl_wifstopped, pcntl_wstopsig, pcntl_wtermsig, openlog, apache_get_modules, apache_get_version,apache_getenv, apache_note, apache_setenv, virtual, eval, allow_url_fopen, pconnect, p_connect,posix_getpwuid,fileowner,symlink,readlink,stream_select,pcntl_alarm,pcntl_fork,pcntl_waitpid,pcntl_wait,pcntl_wifexited,pcntl_wifstopped,pcntl_wifsignaled,pcntl_wexitstatus,pcntl_wtermsig,pcntl_wstopsig,pcntl_signal,pcntl_signal_dispatch,pcntl_get_last_error,pcntl_strerror,pcntl_sigprocmask,pcntl_sigwaitinfo,pcntl_sigtimedwait,pcntl_exec,pcntl_getpriority,pcntl_setpriority

Extending / resizing lvm disk to free space

When you use lvm and still have free space on a virtual or physical disk,you can extend your lvm partition to use all free space.

Firstly you should be sure it exists.

Type “vgdisplay” command in root shell.You should see some free space in “Free  PE Size”

After that you should type this command “lvextend -l +100%FREE /dev/volgroup/logvol

After it finishes type resize command according to your file system.

For XFS : xfs_growfs /dev/centos/logvol

For EXT4: resize2fs /dev/centos/logvol

Attention : “logvol” word represents your logical volume.You can see its name in vgdisplay command output.

Install and activate quota on Linux

Install the quota tools on your server.(debian – ubuntu)

sudo apt install quota

Edit your fstab file under etc folder:

/dev/sda1 / ext4 usrquota,grpquota 0 0

and remount it to take effect immediately:

sudo mount -o remount / (or whereever you want to enable)

Enable quota.This command will create two files on file system like /aquota.user and /aquota.group :

sudo quotacheck -ugm /

Activate the quota

sudo quotaon -v /


Mount remote ftp to your server

If you use debian or ubuntu,you should install the package first.

apt-get install curlftpfs

After the installation,create a folder where will you mount to.for example /mnt/rftp

sudo mkdir /mnt/rftp

curlftp’s format and its parameters are simple.for example,we have an ftp account like olriss and password: 123x4P at 192.168.1.199

in local server,mount remote ftp with using this command

curlftpfs olriss:123x4P@192.168.1.199 /mnt/rftp/

curlftps is similar to nfs tools so you can review the mounted ftp area in your mounted drive list.so check it with “mount -a” command.

after your work is finished,you can unmount it with similar way as nfs unmounting.You won’t need all parameters to unmount,You just unmount the folder like below,

umount /mnt/rftp