Phalcon Php Framework 3.x Installation

Phalcon 3.x (old version) installation steps on Cyber Panel + Ubuntu 20 server

1.Install the pecl and pear plugins for the php version you want.

apt install lsphp72-pecl lsphp72-pear


2. Download Phalcon 3.4.5 tar file.

wget https://github.com/phalcon/cphalcon/archive/refs/tags/v3.4.5.tar.gz

tar zxvf v3.4.5.tar.gz

cd cphalcon-3.4.5/build/

./install


3.If all steps are successful, add the ini file

Create phalcon.ini file under /usr/local/lsws/lsphp72/etc/php/7.2/mods-available. Restart openlitespeed.

cat phalcon.ini

#extension=psr.so #Required for v4 and later.
extension=phalcon.so


Note: Similarly, you can install Phalcon v4, but it requires psr plugin. For this;

cd /usr/local/lsws/lsphp72/bin

./pecl install psr-1.1.0


PwnKit Local Privilege Escalation Vulnerability polkit’s pkexec (CVE-2021-4034)

A memory corruption vulnerability (CVE-2021-4034) in PolKit, a component used in major Linux distributions and some Unix-like operating systems, can be easily exploited by local unprivileged users to gain full root privileges.

https://blog.qualys.com/vulnerabilities-threat-research/2022/01/25/pwnkit-local-privilege-escalation-vulnerability-discovered-in-polkits-pkexec-cve-2021-4034

Patch for Ubuntu is Available

https://ubuntu.com/security/notices/USN-5252-1

If you don’t have any patch please remove suid bit from pxexec tool with this command

chmod 0755 /usr/bin/pkexec

Extending / resizing lvm disk to free space

When you use lvm and still have free space on a virtual or physical disk,you can extend your lvm partition to use all free space.

Firstly you should be sure it exists.

Type “vgdisplay” command in root shell.You should see some free space in “Free  PE Size”

After that you should type this command “lvextend -l +100%FREE /dev/volgroup/logvol

After it finishes type resize command according to your file system.

For XFS : xfs_growfs /dev/centos/logvol

For EXT4: resize2fs /dev/centos/logvol

Attention : “logvol” word represents your logical volume.You can see its name in vgdisplay command output.

Extending lvm disk by adding space

On Vmware Esx server,You can increase size of your virtual hard disk easily.If you use lvm for your guest os,you will need to add new virtual hard disk or just increase the size of your current disk.This guide will help you to extend size of the disk after you resize of your virtual disk by using vsphere

After increased the size on ESX ,In Linux Terminal;

rescanning the device.host id can change and it depents to your system.you must do that if you dont want to restart your guest;

echo “- – -” > /sys/class/scsi_host/host0/scan

see your disk and partitions;
fdisk -l

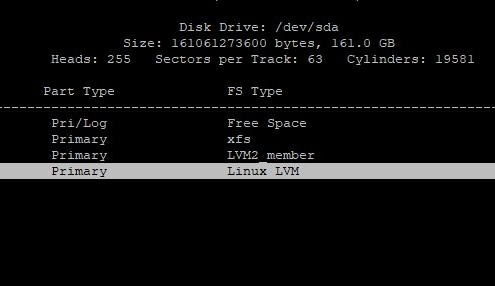
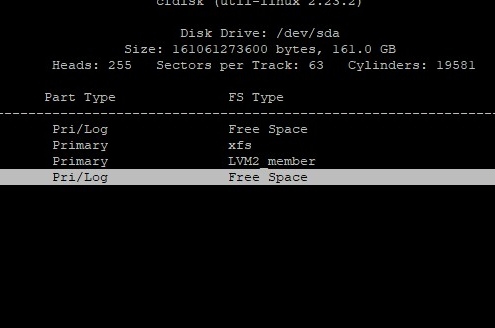
lets add new partitions.after you create the partition,you will need to set type of disk to 8e (LVM)
cfdisk /dev/sda (please note your new partition name sample :sda3

see your disk&partitions status again;
fdisk -l

check for available space;
df -h

scan for new partition
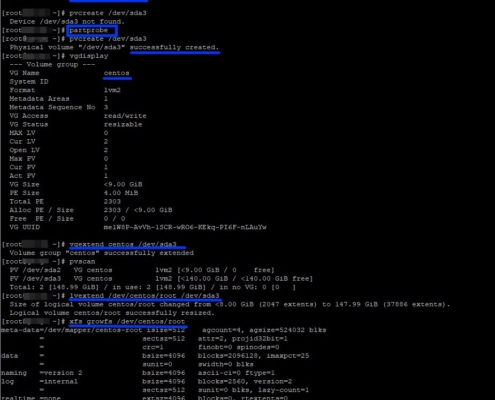
partprobe

create physical volume by using new partitions.(disk name may differ.)
pvcreate /dev/sda3

see your volume group and check and confirm
vgdisplay

extend your volume group
vgextend centos /dev/sda3

recheck;
pvscan

extend your logical volume with using the new part
lvextend /dev/centos/root /dev/sda3

in this point,last step may change according to your file system.if you use xfs ;
xfs_growfs /dev/centos/root

for ext4

resize2fs /dev/centos/root

finally see your new available space

df -h

Prevent your server from bad bot attacks

We need some iptables rules and a file that includes ip addresses.These addresses are belong to bad bots

I use a shell script that reads ip addresses one by one from afile and block it by using iptables.

Firstly,You have to create a file.for example under root folder and it’s name is bad_bot.txt

nano /root/bad_bot.txt.Write it ip addresses that you want to block into this file.You can use my own list bad_bot.txt file

If you want it run at every system boot,please write it in rc.local file.

iptables -F

for x in $(cat /root/bad_bot.txt)
do
iptables -A INPUT -p tcp -s $x –dport 80 -j DROP
iptables -A INPUT -p tcp -s $x –dport 443 -j DROP
done